Windows and mount points…

Those of us who used CP/M and DOS in the early days became accustomed to drive letters which BTW was a good design when most systems has two maybe three devices. The same computer enthusiasts who used CP/M and DOS most likely through education or professional experience were introduced to UNIX at some point. If you are like me this was probably during your college years, we began to realize how much more elegant the UNIX operating system was with novel ideas such as “mount points”, well Microsoft sorta figured this out a few years ago and integrated mount points into Windows. To me there is absolutely no reason that anyone in the server space should be using drive letters (Excluding A:,B:,C: and D: of course) unless legacy applications are hard coded to use drive letters and the move to mount points is just too painful (unfortunately in the past drive letters were the only way to address storage devices, if you are still doing this for new applications shame, shame!). One issue with mount points is an inability to easily determine total, used, and free space for a physical device from Windows Explorer. While I use mount points almost exclusively, many of my customers complain of the need to drop to the CLI (only a complaint you would hear in the Windows world…. although I agree it is nice to have a single view of all physical devices, like that provided by Windows Explorer). They could open Disk Management but that too is kind of cumbersome to just view available space. Here is a small VB script that I wrote that will provide total, used and free space for physical devices by enumerating the devices that match a specific drive label:

——— SCRIPT STARTS HERE ———

WScript.Echo “B2D Capactiy Reporter – ” & Date
Wscript.Echo “RJB – 1/2/2008”
Wscript.Echo “———————————–”

Dim totalB2D, totalUSED, totalFREE
totalB2D = 0
totalUSED = 0
totalFREE = 0

strComputer = “.”
Set objWMIService = GetObject(“winmgmts:” _
& “{impersonationLevel=impersonate}!\\” & strComputer & “\root\cimv2”)

Set colItems = objWMIService.ExecQuery(“Select * from Win32_Volume where label like ‘b2d%‘”)

For Each objItem In colItems
WScript.Echo “Label: ” & objItem.Label
WScript.Echo “Mount Point: ” & objItem.Name
WScript.Echo “Block Size: ” & (objItem.BlockSize / 1024) & “K”
WScript.Echo “File System: ” & objItem.FileSystem
WScript.Echo “Capacity: ” & round(objItem.Capacity / 1048576 / 1024,2) & ” GB”
WScript.Echo “Used Space: ” & round((objItem.Capacity – objItem.FreeSpace) / 1048576 / 1024,2) & ” GB”
WScript.Echo “Free Space: ” & round(objItem.FreeSpace / 1048576 / 1024,2) & ” GB”
WScript.Echo “Percent Free: ” & round(objItem.FreeSpace / objItem.Capacity,2) * 100 & ” %”
totalB2D = totalB2D + (objItem.Capacity / 1048576 / 1024)
totalFREE = totalFREE + (objItem.FreeSpace / 1048576 / 1024)
totalUSED = totalUSED + ((objItem.Capacity – objItem.FreeSpace)/ 1048576 / 1024)
Wscript.Echo “———————————–”
Next

WScript.Echo “———————————–”
WScript.Echo “Total B2D Capacity: ” & round(totalB2D / 1024,2) & ” TB”
WScript.Echo “Total Used Capacity: ” & round(totalUSED / 1024,2) & ” TB”
WScript.Echo “Total Free Capacity: ” & round(totalFREE / 1024,2) & ” TB”
WScript.Echo “Total Percent Free: ” & round(totalFREE / totalB2D,2) * 100 & ” %”

——— SCRIPT ENDS HERE ———

This script was originally written to report the utilization of devices that were being used as Backup-to-Disk targets, hence the name B2D Capacity Reporter. The scripts keys on the disk label so it is important to label the disks properly so that it will report accurately (this can be done from Disk Management or the Command line). I have bolded above the only change that really needs to be made to make the script function properly. This script could easily be modified to report across multiple systems which could be useful if you are looking to tally all the space across multiple servers.

I have only tested this on Windows 2003 so I am not sure how it will function on other versions of Windows. Enjoy!

Oh, one more thing. When you save the script be sure to run it with cscript not wscript (e.g. – cscript diskspace.vbs).

The effect of latency and packet loss on effective throughput

One of my customers who was running three replication technologies, XOsoft, PlateSpin and EMC MirrorView started experiencing issue when we relocated their DR equipment from the production facility where we staged and tested the applications to their DR location.

While having the Producion and DR environments on the LAN we successfully replicated Exchange with XOsoft, Operating Systems with PlateSpin and Data with MirrorView, once we moved DR infrastructure these components all failed. This prompted us to perform network remediation. The following are the results of a simple ping test that was performed using WinMTR.

image

The above chart shows the output from output from a simple test which shows packets, hops, latency and % packet loss. We ran this tests a number of times from different source and destination hosts with similar results. The originating host for this for this host was 192.168.123.6 in the chart below 192.168.120.1 is the first hop.

NOTE: the destination 192.168.121.52 was sent 414 packets but only received 384 (NOTE: this number worsens over time). This is consistent with the behavior that XOsoft, PlateSpin and MV are experiencing.

The graph below represent the impact of packet loss on bandwidth. As you can see 1% packet loss has a dramatic affect on relative bandwidth.

image

Using a bandwidth calculator found here http://www.wand.net.nz/~perry/max_download.php, we calculated the relative bandwidth using the metrics we observed.

  • An effective speed of ~ 30KB/s was calculated using 7% packet loss, a 10Mbit link and 90ms RTT
    • with 15ms RTT the effective speed is ~ 185 KB/s
  • An effective speed of ~ 128KB/s was calculated using 1% packet loss, a 10Mbit link and 90ms RTT
    • with 15ms RTT the effective speed is ~ 700 KB/s

These number are dramatic when compared to the expected 9 Mbit or 1152 KB/s

In conclusion a clean network is critical, especially with technologies like replication that rely on little or to no packet loss and the use of all the bandwidth available. Interestingly enough we seem to be seeing these sort of problems more and more often. My hypothesis is that more and more organizations are looking to implement DR strategies and data replication in a critical component to these strategies, understanding this I believe this problem will get worse before it gets better. For years many of these organizations have used applications and protocols which are tolerant of packet loss, congestion, collisions, etc… protocols like http, ftp, etc… Data replication technologies are far less forgiving so network issues that have most likely existed for sometime are rearing their head at inopportune times.

WAAS “Tales from the Field” – Episode 1

I had the pleasure of working with an application (referred to in the blog as APPX) that could use some serious TLC about a month ago. Apperently APPX is in wide use by isurance agencies and brokers. I waas-perfnow know more about the interworkings of APPX than I want to know – and for the life of me can not figure out why the heck anyone would write an enterprise application ontop of the JET database, the answer I was given by the application developer is not everyone has MS SQL Server? OK – but if you are small enough not to have MS SQL Server (BTW – thats pretty freakin small) download MSDE it is free – or better yet why not use MySQL, Postgres, etc… anything but JET – ODBC, JDBC people it’s not 1972 :(. Here is how the saga began. A customer of ours was looking to remove file servers and print servers from 8 branch locataions. The articulated applications were standard CIFS shares and print services – a perfect fit for Cisco WAAS (Wide Area Application Services), a product which uses WAN accerleration technology and caching to remove WAN latency thus providing LAN like performane over the WAN.

The plan was to migrate the data from the 8 branch locations to a core location (the datacenter) and have the users access the data over the WAN. The customer would then be able to remove the server infrastructure and all associated management from the edge locations. Does not get any simpler than this, or so we thought.

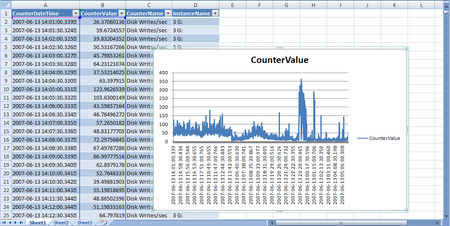
A bit of background information. The depoloyment model for the CISCO WAAS gear was to use WCCP NOT inline cards to route the appropriate traffic through the WAE. Pretty early in the process we realized that the end users sitting in the remote location and accessing a SMB/CIFS share in core location were expeiencing huge delays from within the APPX, which was run from a network share and sort of a hyrbid client/server/web application. Fast forward 3 weeks, I finally show up on site to try and resolve a ghostly performance issue. At this point acceleration and caching of FTP, HTTP, CIFS, etc… had been fully vetted and verified as working properly. BUT APPX was still expreiencing significant performance issues. Immediately I began to believe it was an application specific issue – in the end the assuption was correct but lets explore how we identified the issue.

Step 1: Contact the application developer and understand exactly waas-topology
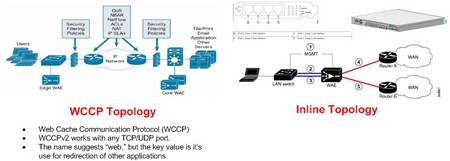
what the application does and the chronology of the steps.

The following are the notes/bullets taken away from the conversation with APPX developer:

  • Documents produced and mdb files can in fact be stored on different paths – the applcation uses a .mdb (JET database – HINT #1 PROBABLE LOCKING ISSUE) and .dot word templates to create form letters.
  • When APPX creates files it prefixes the documents with “s” or “m” – “S” refers to schedule and M refers to memo
  • APPX also suffixes the document with a numeric value – this value is the record locator
  • The path to templates and proposals are stored in proposal.mdb
  • Document locataions are strored in APPX personalization

As I mentioned above the APPX installation including the .dot and .mdb files were stored on a network share.

Step 2: Plan of attack

  • Test the performance with the APPX folder (application) stored on the to local path (c: root) – Run wizard.exe to change the path
    • Write the new template path. Writes the template path to the proposal.mdb
  • If this worked the path changes could be changed via the registry. Which meant that we could automate the changes so that the users will not need to run the wizard.exe process. This will simplify a complete rollout of the local APPX installation.

NOTE: Currently (prior to the WAAS deployment) when a new template is created the APPX directory is robocopied to network shares at the 8 remote locations. The new process would be to use a login script to copy the APPX install to the local workstations when an change is made. Pre-positioning could be used in this case to increase the prerformace of the initial load. Not only will this solve the performance issue but it also represents a significant improvement to the currrent process. The automation of updating the templates using login scripts removes the robocopy responsibility from the IT staff and ensures that the users are always operating from the latest database and templates.

NOTE: reg key location for the APPX ditro directory – HKCU/Software/APPX/

Step 3: The actions taken to resolve the issue

Creation of scripts listed below to automate the required changes:


  • update_distro.bat – creates APPX distribution as appxload.exe
  • logon.bat – user logon script (encompasses commands from upappx.bat and regchg.bat)
  • upappx.bat – Standalone script to updates users local c:\appx install
  • regchg.bat – Standalone script to modifies APPX db directory location reg key
  • appx_redirect_to_C.reg – reg key

All scripts housed in centralized network location ie \\core\share\waas_appx_scripts.

The logon scripts are located at \\core\netlogon

Ultimately to increase the speed of APPX the APPX Word document templates and mdb lookup databases will be moved from \\core\share\appx\database to c:\appx\database on the users localhost.

These changes dramatically increased the performance of the APPX, the belief is that performance problems were due to jet database related locking and lock release issues that were worsened due to WAN latency. During the automation process I did in fact verify that locks are placed on mdb files on a fairly regular basis. Initially I was told by the application developer, that the mdb files are not changed and locks are not placed on these files but this is not the case. Interestingly enough the APPX folks stated that most users are going to a more distributed model vs. a consolidated model. After understanding the application architecture it is not hard to understand why.

The process going forward would be the following is the following:

  • Users in core will continue to run from the LAN location – While performance could probably be faster if they followed the same deployment model as listed above because the LAN locking is most likely slowing performance the application response time is adquate so it was decided that it would be left as is.
  • There is a single administrator in the core location who modifies the templates – this typically happens weekly but may happen more frequently
  • In the past these changes would be robocopied by IT to local shares in each remote office on Sunday nights. The new automated user update process removes the need for IT to manage the distribution of the APPX changes on a weekly basis. Users will now have access to updated APPX on a daily basis vs. weekly. Updates will be performed when the user logs in.
  • There is now a scheduled task that has been created on \\core that performs the following tasks:
    • The scheduled task name is appx_load
      • Copies the APPX directory from d:\share\appx to d:\share\waas_appx_scripts\appx
      • This step is required because there are locks on the mdb files in the \\core\share\appx directory and the files were skipped by 7z during compression.
    • Once the copy of APPX is complete the APPX directory is packed into a self-executable 7z files name appxload.exe
    • The scheduled task runs at 2AM S,M,T,W,T,F
    • The appx_load scheduled task runs update_distro.bat which contains the following two commands:
      • xcopy /e /y d:\share\appx d:\share\waas_appx_scripts\appx
      • “c:\program files\7-zip\7z.exe” a -sfx appxload d:\share\waas_appx_scripts\appx
    • This step is required because the compressed file transfer is far faster than using robocopy to update the users local APPX installation.
  • The logon.bat script has been modified to copy the appxload.exe to c:\appxload.tmp on the users local machine
  • Next appx.exe is run and unpacks the the APPX distribution to c:\appx
    • NOTE: There is no measurable difference in user logon time. The customer is very happy with the process
    • NOTE: The robocopy process was taking between 4 minutes for the initial copy and 30 seconds for updates
  • Last the logon script modifies the db directory reg key to point to the new appx location
  • The commands that are run in the logon.bat are also separated into two standalone .bat files
    • upappx.bat and regchg.bat

NOTE: 7-Zip has also been installed on the \\core server and is required

NOTE: Once all the users have logged on and their reg keys modified the regedit command can be removed from the logon.bat script.

Script Details:

logon.bat:

rem update local APPX distro
@echo off
mkdir c:\appxload.tmp
copy \\core\share\waas_appx_scripts\appxload.exe c:\appxload.tmp
c:\appxload.tmp\appxload.exe -oc:\ -y
rem update APPX reg key
regedit.exe /s \\core\share\waas_appx_scripts\appx_redirect_to_C.reg

update_distro.bat

xcopy /e /y d:\share\appx d:\share\waas_appx_scripts\appx
“c:\program files\7-zip\7z.exe” a -sfx appx d:\vol15\waas_appx_scripts\appx

appx_redirect_to_C.reg

Windows Registry Editor Version 5.00
[HKEY_CURRENT_USER\Software\APPX]
“Database Directory”=”c:\\APPX\\DATABASE\\”

upappx.bat

@echo off
mkdir c:\appxload.tmp
copy \\core\share\waas_appx_scripts\appxload.exe c:\appxload.tmp
c:\appxload.tmp\appxload.exe -oc:\ -y

regchg.bat

regedit.exe /s \\core\share\waas_appx_scripts\appx_redirect_to_C.reg

So that more detail than I thought I would write. Obviously the actual application is not listed in the blog, but if you are interested in that app please send me an Email rich@bocchinfuso.net. I would be more than happy yo share more of the detail with you. Also if you find any typos, etc… in the post please leave a comment.

BTW- The customer has now been running for about 30 days and they are happy with the performance.

Performance Analysis

So let me set the stage for this blog. I recently completed a storage assessment for a customer. Without boring you with the details one of the major areas of concern was the Exchange environment, I was provided with proem data from two active Exchange cluster member to be used for analysis. The proem data was collected on both cluster members over the course of a week at 30 second intervals – THAT’S ALOT OF DATA POINTS. Luckily the output was provided in .blg (binary log) format because I am not sure how well Excel would have handled opening a .CSV file with 2,755,284 rows – YES you read that correctly 2.7 million data points – and that was after I filtered the counters that I did not want.

The purpose of this post is to walk through how the data was ingested and mined to produce useful information. Ironically having such granular data point while annoying at the onset proved to be quite useful when modeling the performance.

First let’s dispense with some of the requirements:

  • Windows XP, 2003
  • Windows 2003 Resource Kit (required for the log.exe utility)
  • MSDE, MSSQL 2000 (I am sure you can use 2005 – but why – it is extreme overkill for what we are doing)
  • A little bit of skill using osql
    • If you are weak 🙂 and using MSSQL 2000 Enterprise Manager can be used
  • A good SQL query tool
  • MS Excel (I am using 2007 – so the process and screen shots may not match exactly if you are using 2003, 2000, etc…)
    • Alternatively a SQL reporting tool like Crystal could be used. I choose Excel because the dataset can easily be manipulated once in a spreadsheet.
  • grew for Windows (http://gnuwin32.sourceforge.net/packages/grew.htm) – ensure this is in your path

OK – now that the requirements are out of the way let’s move on. I am going to make the assumption that the above software is installed and operational, otherwise this blog will get very, very long. NOTE: It is really important that you know the “sa” password for SQL server.

Beginning the process:

Step 1: Create a new data base (my example below uses the data base name “test” – you should use something a bit more descriptive)

Microsoft Windows XP [Version 5.1.2600]
(C) Copyright 1985-2001 Microsoft Corp.

C:\Documents and Settings\bocchrj>osql -Usa
Password:
1> create database test
2> go
The CREATE DATABASE process is allocating 0.63 MB on disk ‘test’.
The CREATE DATABASE process is allocating 0.49 MB on disk ‘test_log’.
1> quit

C:\Documents and Settings\bocchrj>

NOTE: This DATABASE will be created in the default DATA location under the SQL SVR install directory. Make sure you have enough capacity – for my data set of 2.7 million rows the database (.mdf) was about 260 MB.

Step 2: Create an ODBC connection to the database

A nice tutorial on how to do this can be found here: http://www.truthsolutions.com/sql/odbc/creating_a_new_odbc_dsn.htm

Two things to note:

  • Use the USER DSN
  • Use SQL Server Authentication (NOT NT Authentication) the user name is “sa” and hopefully you remembered the password.

Step 3: Determine relevant counters

Run the following command on the .blg file: log -q perf.blg > out.txt

This will list all of the counters to the text file out.txt. Next open counters.txt in you favorite text editor and determine which counters are of interest (NOTE: Life is much easier if you import a specific counter class into the database, create new a new database for a new counter class)

Once you determine the counter class e.g. PhysicalDisk run: log -q perf.blg | grew PhysicalDisk > counters.txt

Step 3: Import the .blg into the newly created database.

  • NOTE: There are two considerations here

    • Are the data points contained in a single .blg file (if you have 2.7 million data points this is unlikely)? If they are the command to do the import is fairly simple:

      • log perf.blg -cf counter.txt -o SQL:DSNNAME!description

    • If the data points are contained in a number of files make sure that these files are housed in the a directory. You can use the following PERL script to automate the import process (NOTE: This requires that PERL be installed – http://www.activestate.com/Products/ActivePerl/)

#!/usr/bin/perl -w

# syntax: perl import_blg.pl input_dir odbc_connection_name $counter
# e.g. – perl import_blg_pl

#DO NOT EDIT BELOW THIS LINE
$dirtoget=”$ARGV[0]”;
$odbc=”$ARGV[1]”;
$counter=”$ARGV[2]”;
$l=0;

opendir(IMD, $dirtoget) || die(“Cannot open directory”);
@thefiles= readdir(IMD);
closedir(IMD);

foreach $f (@thefiles)
{
unless ( ($f eq “.”) || ($f eq “..”) )
{
$label=$l++;
system “log \”$dirtoget\/$f\” -cf $counter -o SQL:$odbc!$label”;
}
}


  • If the import is working properly you should see output similar to the following:

Input
—————-
File(s):
C:\perf_log – 30 second interval_06132201.blg (Binary)

Begin: 6/13/2007 22:01:00
End: 6/14/2007 1:59:30
Samples: 478

Output
—————-
File: SQL:DSNNAME!1.blg

Begin: 6/13/2007 22:01:00
End: 6/14/2007 1:59:30
Samples: 478

The command completed successfully.

Step 4: OK – The data should now be imported into the database. We will now look at the DB structure (table names) and run a test query. At this point I typically start using SQL Manager 2005 Lite but you can continue to use osql or Enterprise Manager (uggghhhh). For the purposes of cutting and pasting examples I used osql.

  • This is not a DB 101 tutorial but you will need to be connected to the database we created earlier.

  • Once connected run the following query (I cut out non relevant information in the interest of length):

C:\Documents and Settings\bocchrj>osql -Usa
Password:
1> use test
2> go
1> select * from subjects where type = ‘u’ order by name
2> go
CounterData
CounterDetails
DisplayToID

(3 rows affected)
1>

CounterData and CounterDetails are the two tables we are interested in:

Next lets run the query to display the first 100 rows of the CounterDetails table to verify that the data made its way from the .blg file to the database

1> select top 20 * from counterdetails
2> go
SHOULD SCROLL 20 RECORDS
(20 rows affected)
1>quit

Step 5: Determining what to query

Open counters.txt in your favorite browser and determine what you want to graph – there are a number of metrics, pick one you can get more complicated once you get the hang of the process.

e.g. When you open the text file you will see a number of rows that look like this – Take note of bold sections below, this is the one of the filters that will be used when selecting the working dataset

\test\PhysicalDisk(4)\Avg. Disk Bytes/Read
\test\PhysicalDisk(5)\Avg. Disk Bytes/Read
\test\PhysicalDisk(6 J:)\Avg. Disk Bytes/Read
\test\PhysicalDisk(1)\Avg. Disk Bytes/Read
\test\PhysicalDisk(_Total)\Avg. Disk Bytes/Read
\test\PhysicalDisk(0 C:)\Avg. Disk Write Queue Length
\test\PhysicalDisk(3 G:)\Avg. Disk Write Queue Length
\test\PhysicalDisk(4)\Avg. Disk Write Queue Length
etc…

Once you determine which performance counter is of interest open Excel.

Step 6: Understanding the anatomy of the SQL query

SELECT
CounterData.”CounterDateTime”, CounterData.”CounterValue”,
CounterDetails.”CounterName”, CounterDetails.”InstanceName”
FROM
{ oj “test“.”dbo”.”CounterData” CounterData INNER JOIN “test“.”dbo”.”CounterDetails” CounterDetails ON
CounterData.”CounterID” = CounterDetails.”CounterID”}
WHERE
CounterDetails.”InstanceName” = ‘3 G:‘ AND CounterDetails.”CounterName”=’Disk Writes/sec‘ AND CounterData.”CounterDateTime” like ‘%2007-06-13%’

  • The above query will return all the Disk Writes/sec on 6/13/2007 for the G: drive.
  • In the above query I have BOLDED the VARIABLES that should be modified when querying the database. The JOINS should NOT be modified. You may add additional criteria like multiple INSTANCENAME or COUNTERNAME fields to grab, etc…. Below you will see exactly how to apply the query.

Step 7: Run the query from Excel (NOTE: Screen shots are of Excel 2003, the look and feel will be different for other versions of Excel)

ex-query1

Once you select “From Microsoft Query” the next screen will appear

dsn

Select the DSN that you defined earlier. NOTE: Also uncheck the “Use the Query Wizard to create/edit queries. I will provide the query syntax which will make life much easier.Now you need to login to the database. Hopefully you remember the sa password.

login add

Once the login is successful – CLOSE the add tables window

Now you will see the MS Query Tool Click the SQL button on the toolbar. Enter the SQL query into the SQL text box and hit OK. You will recite a warning – just hit OK and continue.

Use the query syntax explained above.

sql

Once the query is complete it will return a screen that looks like this:

q

Now hit the 4th button from the left on the tool bar “Return Data” – this will place the data into Excel so that is can be manipulated:

e

Once the data is placed into Excel you can begin to graph and manipulate it.

out

I hope this was informative, if you find any errors in the process please place a comment to the post.