EMC Forum 2014 New York – It’s all about the cloud and SDW!!

This years EMC Forum 2014 New York is approaching quickly, October 8th is just around the corner and I am really excited!!!

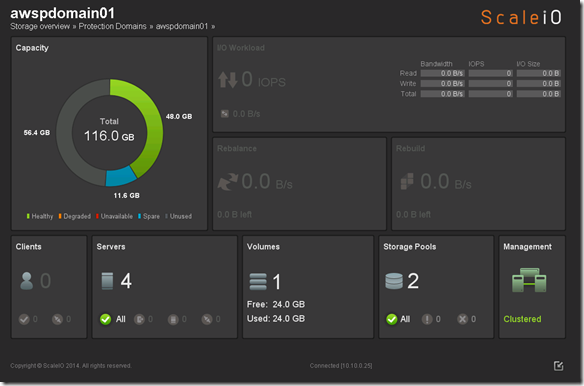
Over the years we (FusionStorm NYC) have typically prepped a demo for EMC Forum and rolled a 20U travel rack complete with networking, servers, storage arrays, and whatever else we needed for the demo to EMC Forum.  In the past we’ve done topics like WAN Optimization, VMware SRM, VMware vCOps, and last year XtremSW.  As a techie it’s always been cool to show the flashing lights, how things are cabled, etc… but this year it’s all about the cloud, commodity compute and and SDW (Software Defined Whatever) and elasticity which is why there will be no 20U travel rack, nothing more than a laptop and an ethernet cable that will connect to a ScaleIO 1.3 AWS (Amazon Web Services) implementation.  The base configuration that I have built in AWS specifically for EMC Forum looks like this:

  • 10 x SDS (ScaleIO Data Server) Nodes in AWS (SLES 11.3)
    • Each node has 1 x 100 GB EBS SSD attached
  • 1 x SDC (ScaleIO Data Client) Node in AWS (Windows 2008 R2)
    • Using IOmeter and vdbench on SDC to generate workload
  • Single Protection Domain:  awspdomain01
  • Single Pool:  awspool01
  • 40GB awsvol01 volume mapped to Windows SDC

image

Terminology:

  • Meta Data Manager (MDM) – Configures and monitors the ScaleIO system. The MDM can be configured in a redundant Cluster Mode with three members on three servers, or in a Single Mode on a single server.
  • ScaleIO Data Server (SDS) – Manages the capacity of a single server and acts as a backend for data access. The SDS is installed on all servers that contribute storage devices to the ScaleIO system. These devices are accessed through the SDS.
  • ScaleIO Data Client (SDC) – A lightweight device driver that exposes ScaleIO volumes as block devices to the application residing on the same server on which the SDC is installed.

New Features in ScaleIO v1.30:
ScaleIO v1.30 introduces several new features, listed below. In addition, it includes internal enhancements that increase the performance, capacity usage, stability, and other storage aspects.

Thin provisioning:
In v1.30, you can create volumes with thin provisioning. In addition to the on-demand nature of thin provisioning, this also yields much quicker setup and startup times.
Fault Sets: You can define a Fault Set, a group of ScaleIO Data Servers (SDSs) that are likely to go down together (For example if they are powered in the same rack), thus ensuring that ScaleIO mirroring will take place outside of this fault set.
Enhanced RAM read cache: This feature enables read caching using the SDS server RAM.
Installation, deployment, and configuration automation:  Installation, deployment, and configuration has been automated and streamlined for both physical and virtual environments. The install.py installation from previous versions is no longer supported.
This is a significant improvement that dramatically improves the installation and operational management.

image

image

image

VMware management enhancement: A VMware, web-based plug-in communicates with the Metadata Manager (MDM) and the vSphere server to enable deployment and configuration directly from within the VMware environment.

GUI enhancement: The GUI has been enhanced dramatically. In addition to monitoring, you can use the GUI to configure the backend storage elements of ScaleIO.

GUI enhancements are big!!

clip_image002

clip_image002[5]

Active Management (huge enhancement over the v1.2 GUI):

imageimage

Smile Of course you can continue to use the CLI Smile:

  • Add Protection Domain and Pool:
    • scli –mdm_ip 172.31.43.177 –add_protection_domain –protection_domain_name awspdomain01
    • scli –mdm_ip 172.31.43.177 –add_storage_pool –protection_domain_name awspdomain01 –storage_pool_name awspool01
  • Add SDS Nodes:
    • scli –mdm_ip 172.31.43.178 –add_sds –sds_ip 172.31.43.177 –protection_domain_name awspdomain01 –device_path /dev/xvdf –storage_pool_name awspool01 –sds_name aws177sds
    • scli –mdm_ip 172.31.43.178 –add_sds –sds_ip 172.31.43.178 –protection_domain_name awspdomain01 –device_path /dev/xvdf –storage_pool_name awspool01 –sds_name aws178sds
    • scli –mdm_ip 172.31.43.178 –add_sds –sds_ip 172.31.43.179 –protection_domain_name awspdomain01 –device_path /dev/xvdf –storage_pool_name awspool01 –sds_name aws179sds
    • scli –mdm_ip 172.31.43.178 –add_sds –sds_ip 172.31.43.180 –protection_domain_name awspdomain01 –device_path /dev/xvdf –storage_pool_name awspool01 –sds_name aws180sds
    • scli –mdm_ip 172.31.43.178 –add_sds –sds_ip 172.31.43.181 –protection_domain_name awspdomain01 –device_path /dev/xvdf –storage_pool_name awspool01 –sds_name aws181sds
    • scli –mdm_ip 172.31.43.178 –add_sds –sds_ip 172.31.43.182 –protection_domain_name awspdomain01 –device_path /dev/xvdf –storage_pool_name awspool01 –sds_name aws182sds
    • scli –mdm_ip 172.31.43.178 –add_sds –sds_ip 172.31.43.183 –protection_domain_name awspdomain01 –device_path /dev/xvdf –storage_pool_name awspool01 –sds_name aws183sds
    • scli –mdm_ip 172.31.43.178 –add_sds –sds_ip 172.31.43.184 –protection_domain_name awspdomain01 –device_path /dev/xvdf –storage_pool_name awspool01 –sds_name aws184sds
    • scli –mdm_ip 172.31.43.178 –add_sds –sds_ip 172.31.43.185 –protection_domain_name awspdomain01 –device_path /dev/xvdf –storage_pool_name awspool01 –sds_name aws185sds
    • scli –mdm_ip 172.31.43.178 –add_sds –sds_ip 172.31.43.186 –protection_domain_name awspdomain01 –device_path /dev/xvdf –storage_pool_name awspool01 –sds_name aws186sds
  • Add Volume:
    • scli –mdm_ip 172.31.43.178 –add_volume –protection_domain_name awspdomain01 –storage_pool_name awspool01 –size 40 –volume_name awsvol01
  • Add SDC:
    • Add Windows SDC (would look different on Linux / Unix):
      • C:\Program Files\EMC\ScaleIO\sdc\bin>drv_cfg.exe –add_mdm –ip 172.31.43.177,172.31.43.178
        Calling kernel module to connect to MDM (172.31.43.177,172.31.43.178)
      • ip-172-31-43-178:~ # scli –query_all_sdc
        Query all SDC returned 1 SDC nodes.
        SDC ID: dea8a08300000000 Name: N/A IP: 172.31.43.7 State: Connected GUID: 363770AA-F7A2-0845-8473-158968C20EEF
        Read bandwidth:  0 IOPS 0 Bytes per-second
        Write bandwidth:  0 IOPS 0 Bytes per-second
  • Map Volume to SDC:
    • scli –mdm_ip 172.31.43.178 –map_volume_to_sdc –volume_name awsvol01 –sdc_ip 172.31.43.7

REST API:  A  Representational  State  Transfer  (REST)  API can be used to expose monitoring and provisioning via the REST interface.
OpenStack support:  ScaleIO includes a Cinder driver that interfaces with OpenStack, and presents volumes to OpenStack as block devices which are available for block storage. It also  includes an OpenStack Nova driver, for handling compute and instance volume-related operations.
Planned shutdown of a Protection Domain:  You can simply and effectively shut down an entire Protection Domain, thus preventing an unnecessary rebuild/rebalance operation.
Role-based access control: A role-based access control mechanism has been introduced.
Operationally Planned shutdown of a Protection Domain is a big enhancement!!

IP roles: For each IP address associated with an SDS, you can define the communication role that the IP address will have: Internal—between SDSs and MDMs; External—between ScaleIO Data Clients (SDCs) and SDSs; or both. This allows you to define virtual subnets.
MDM— IP address configuring: You can assign up to eight IP addresses to primary, secondary, and tie-breaker MDM servers, thus enhancing MDM communication redundancy. In addition, you can configure a specific IP address that the MDM will use to communicate with the management clients. This enables you to configure a separate management network so you can run the GUI on an external system.

Note:  The above new features where taken from the Global Services Product Support Bulletin ScaleIO Software 1.30 (Access to this document likely requires a support.emc.com login).  I have played with most of the new features but not all of them, IMO v1.3 provides a major a leap forward in usability.

While big iron (traditional storage arrays) probably are not going away very soon the cool factor just doesn’t come close to SDW (Software Defined Whatever) so stop by the FusionStorm booth at EMC Forum and let’s really dig into some very cool stuff.

If you are really interesting in digging into to ScaleIO one-on-one please email me (rbocchinfuso@fusionstorm.com) or tweet me @rbocchinfuso and we can setup a time where we can focus, maybe a little more than will be possible at EMC Forum.

Looking forward to seeing at the FusionStorm booth at EMC Forum 2014 New York on October 8th.  If you haven’t registered for EMC Forum you should register now, Forum is only 12 days away.

ScaleIO – Chapter II: Dreadnought class

Khan: “Dreadnought class. Two times the size, three times the speed. Advanced weaponry. Modified for a minimal crew. Unlike most Federation vessels, it’s built solely for combat.”

Extending ScaleIO to the public cloud using AWS RHEL 6.5 t1.micro instances and EBS and federating with my private cloud ScaleIO implementation.

This post is about federating ScaleIO across the public and private cloud not the “Federation” of EMC, VMware, Pivotal and RSASmile Sorry but who doesn’t love the “Federation”, if for nothing else it takes me back to my childhood.

My Childhood:

Federation President, 2286

If you don’t know what the above means and  the guy on the right looks a little familiar, maybe from a Priceline commercial don’t worry about it,  I just means your part of a different generation (The Next Generation Smile).  If you are totally clueless about the above you should probably stop reading now, if you can identify with anything above it is probably safe to continue.

My Adulthood:

Wow, the above pictorial actually a scares me a little, I really haven’t come very far Smile

Anyway let’s get started exploring the next frontier, certainly not the final frontier.

Note:  I already deployed the four (4) RHEL 6.5 t1.micro AWS instances that I will be using in this post.  This post focuses on the configuration of the instances not the deployment of the AWS instances.  In Chapter III of this series I deploy at a larger scale using a AMI image that I generated from ScaleIO_AWS1 which you will see hos to configure in this posts.

Login to AWS RHEL instance via SSH (Note:  You will have to setup the required AWS keypairs, etc…)Image(24)

Note:  This link provides details on how to SSH to your AWS Linux instances using a key pair(s):  http://docs.aws.amazon.com/AWSEC2/latest/UserGuide/AccessingInstancesLinux.html

Note:  I am adding AWS SDS nodes (ScaleIO Data Server NOT Software Defined Storage) to an existing private cloud ScaleIO implementation so this will only cover installing the SDS component and the required steps to add the SDS nodes to the exiting ScaleIO deployment.

ScaleIO Data Server (SDS) – Manages the capacity of a single server and acts as a backend for data access. The SDS is installed on all servers that contribute storage devices to the ScaleIO system. These devices are accessed through the SDS.

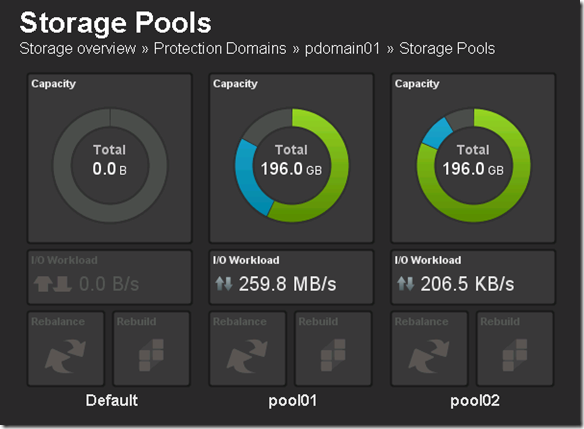
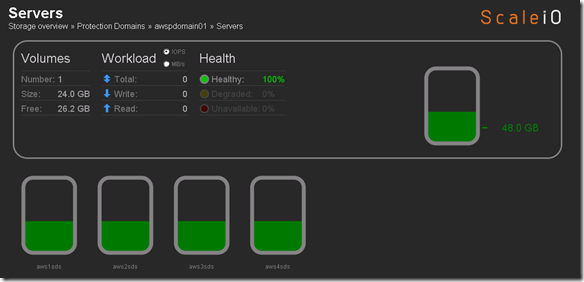
Below is a what the current private cloud ScaleIO deployment looks like:Image(13)

The goal here is to create pool03 which will be a tier of storage that will reside in AWS.

Once logged into your AWS RHEL instance validate that the following packages are installed:  numactl and libaio

    • #sudo –s
    • #yum install libaio
    • #yum install numactl

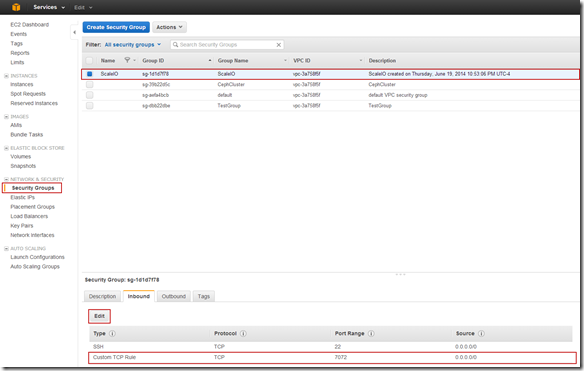
For SDS nodes port 7072 needs to opened.  Because I have a the ScaleIO security group I can make the change in the Security Group.

Note:  This is an environment that is only for testing, there is nothing here that I care about, the data, VMs, etc… are all disposable this opening port 7072 to the public IP is of no concern to me.  In an actual implementation there would likely be a VPN between the public and private infrastructure components and there would not be a need to open port 7072 on the public IP address.

Image(25)

AWS SDS node reference CSV:

IP,Password,Operating System,Is MDM/TB,MDM NIC,Is SDS,is SDC,SDS Name,Domain,SDS Device List,SDS Pool List
#.#.#.#,********,linux,No,,Yes,No,aws1sds,awspdomain1,/dev/xvdf,pool03
#.#.#.#,********,linux,No,,Yes,No,aws2sds,awspdomain1,/dev/xvdf,pool03
#.#.#.#,********,linux,No,,Yes,No,aws3sds,awspdomain1,/dev/xvdf,pool03
#.#.#.#,********,linux,No,,Yes,No,aws4sds,awspdomain1,/dev/xvdf,pool03

Copy the SDS rpm from the AWS1 node to the other 3 nodes:

  • scp /opt/scaleio/siinstall/ECS/packages/ecs-sds-1.21-0.20.el6.x86_64.rpm root@#.#.#.#:~
  • scp /opt/scaleio/siinstall/ECS/packages/ecs-sds-1.21-0.20.el6.x86_64.rpm root@#.#.#.#:~
  • scp /opt/scaleio/siinstall/ECS/packages/ecs-sds-1.21-0.20.el6.x86_64.rpm root@#.#.#.#:~

Note: I copied the ECS (ScaleIO) install files from my desktop to to AWS1 so that is why the rpm is only being copied to AWS2,3 & 4 above.

Add AWS Protection Domain:

  • scli –mdm_ip 10.10.0.25 –add_protection_domain –protection_domain_name awspdomain01

Protection Domain – A Protection Domain is a subset of SDSs. Each SDS belongs to one (and only one) Protection Domain. Thus, by definition, each Protection Domain is a unique set of SDSs.

Add Storage Pool to AWS Protection Domain:

  • scli –mdm_ip 10.10.0.25 –add_storage_pool –protection_domain_name awspdomain01 –storage_pool_name pool03

Storage Pool – A Storage Pool is a subset of physical storage devices in a Protection Domain. Each storage device belongs to one (and only one) Storage Pool. A volume is distributed over all devices residing in the same Storage Pool.  This allows more than one failure in the system without losing data. Since a Storage Pool can withstand the loss of one of its members, having two failures in two different Storage Pools will not cause data loss.

Add SDS to Protection Domain and Pool:

  • scli –mdm_ip 10.10.0.25 –add_sds –sds_ip 54.86.164.18 –protection_domain_name awspdomain01 –device_name /dev/xvdf –storage_pool_name pool03 –sds_name aws1sds
  • scli –mdm_ip 10.10.0.25 –add_sds –sds_ip 54.88.57.16 –protection_domain_name awspdomain01 –device_name /dev/xvdf –storage_pool_name pool03 –sds_name aws2sds
  • scli –mdm_ip 10.10.0.25 –add_sds –sds_ip 54.88.56.160 –protection_domain_name awspdomain01 –device_name /dev/xvdf –storage_pool_name pool03 –sds_name aws3sds
  • scli –mdm_ip 10.10.0.25 –add_sds –sds_ip 54.88.57.237 –protection_domain_name awspdomain01 –device_name /dev/xvdf –storage_pool_name pool03 –sds_name aws4sds

Create 20 GB volume:

  • scli –mdm_ip 10.10.0.25 –add_volume –protection_domain_name awspdomain01 –storage_pool_name pool03 –size 20 –volume_name awsvol01

Some other relevant commands:

  • scli –mdm_ip 10.10.0.25 –remove_sds –sds_name aws1sds
  • scli –mdm_ip 10.10.0.25 –sds –query_all_sds
  • scli –mdm_ip 10.10.0.25 –query_storage_pool –protection_domain_name awspdomain01 –storage_pool_name pool03

Note:  I always use the –mdm_ip switch that way I don’t have to worry where I am running the commands from.

Meta Data Manager (MDM) – Configures and monitors the ScaleIO system. The MDM can be configured in a redundant Cluster Mode with three members on three servers, or in a Single Mode on a single server.

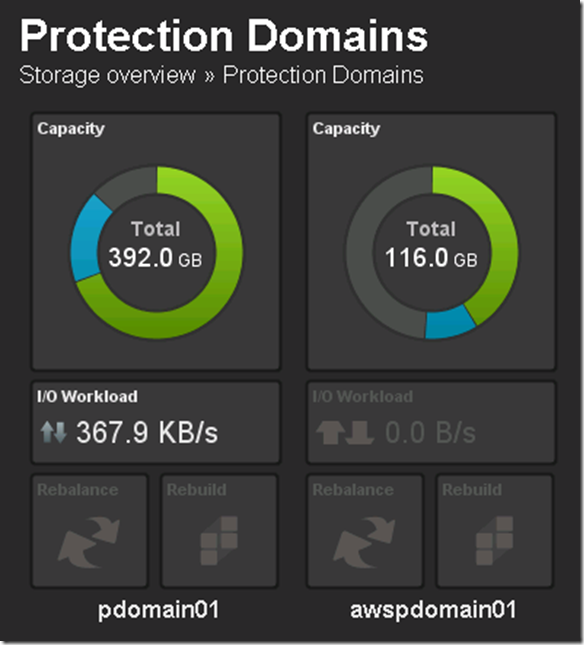
ScaleIO Deployed in AWS and federated with private cloud ScaleIO deploymentImage(26)

My ScaleIO (ECS) implementation now has 3 tiers of storage:

  • Tier 1 (Local SSD) = pdomain01, pool1
  • Tier 2 (Local HDD) = pdomain01, pool2
  • Tier 3 (AWS HDD) = awspdomain01, pool3

Image(27)

Image(28)

Map AWS volume to local SDCs:

  • scli –mdm_ip 10.10.0.25 –map_volume_to_sdc –volume_name awsvol01 –sdc_ip 10.10.0.21
  • scli –mdm_ip 10.10.0.25 –map_volume_to_sdc –volume_name awsvol01 –sdc_ip 10.10.0.22
  • scli –mdm_ip 10.10.0.25 –map_volume_to_sdc –volume_name awsvol01 –sdc_ip 10.10.0.23
  • scli –mdm_ip 10.10.0.25 –map_volume_to_sdc –volume_name awsvol01 –sdc_ip 10.10.0.24

ScaleIO Data Client (SDC) – A lightweight device driver that exposes ScaleIO volumes as block devices to the application residing on the same server on which the SDC is installed.

Map AWS volume to ESX initiators:

  • scli –mdm_ip 10.10.0.25 –map_volume_to_scsi_initiator –volume_name awsvol01 –initiator_name svrsan2011
  • scli –mdm_ip 10.10.0.25 –map_volume_to_scsi_initiator –volume_name awsvol01 –initiator_name svrsan2012
  • scli –mdm_ip 10.10.0.25 –map_volume_to_scsi_initiator –volume_name awsvol01 –initiator_name svrsan2013
  • scli –mdm_ip 10.10.0.25 –map_volume_to_scsi_initiator –volume_name awsvol01 –initiator_name svrsan2014

Note:  I alreadt created the SCSI initiators and named them this is NOT documented in this post.  I plan to craft a A to Z how-to when I get some time.

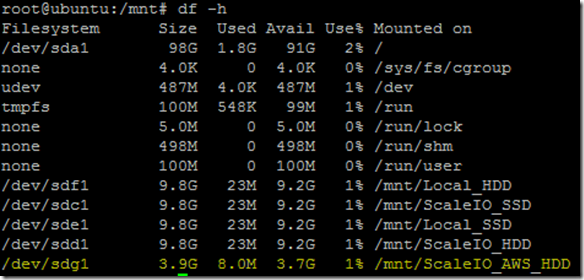
AWS ScaleIO Datastore now available in VMware (of course there are some steps here, rescan, format, etc…)Image(29)

Figured I would do some I/O just for giggles (I am sure it will be very slow, using t1-micro instance and not at scale):

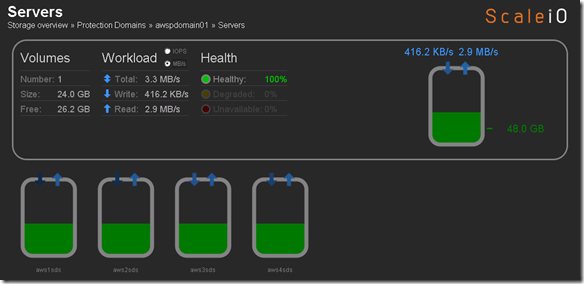
Screenshot below is activity while running I/O load to the AWS volume:Image(31)

Important to note that the public / private ScaleIO federation was PoC just to see how it could / would be done.  It was not intended to be a performance exercise but rather a functional exercise.  Functionally things worked well, the plan is now to scale up the number and type of nodes to see what type of performance I can get from this configuration.  Hopefully no one will push back on my AWS expenses 🙂

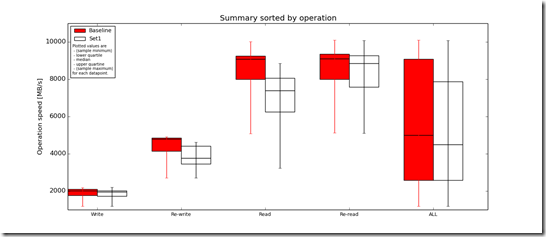
I did some quick testing with FFSB and FIO, after seeing the results returned by both FFSB and FIO i wanted to grab some additional data so I could do a brief analysis so ran IOzone (http://www.iozone.org/) against the AWS ScaleIO volume (awspdomain01, pool03) and the local ScaleIO HDD volume (pdomain01, pool02) for comparison.

 IOzone Results (very preliminary):

  • Baseline = ScaleIO HDD (Local)
  • Set1 = ScaleIO HDD (SDS nodes in AWS)Image(32)

Preliminary ScaleIO Local HDD vs ScaleIO AWS HDD distributed volume performance testing analysis output:  http://nycstorm.com/nycfiles/repository/rbocchinfuso/ScaleIO_Demo/aws_benchmark/index.html

Considering that i only have 4 x t1.micro instances which are very limited in terms of IOPs and bandwidth the above is not that bad.

Next steps:

  • Automate the creation of AWS t1.micro instances and deployment of SDS nodes
  • Additional performance testing
  • Add AWS nodes to Zabbix (http://www.zabbix.com/)

I am interested in seeing what I can do as I scale up the AWS configuration.  Stay tuned.